Have a backlink with me...leave your comments if you're interested

Friday, November 27, 2009

Break password within astrisk


1. Click Start
2. go to RUN type "CMD" and press enter
3. then enter net user command
4. you can see the whole user accounts running on your machine.
5.Then see d user account which u want to change d password

then enter this command
net user {user account name } * ------ put the user account name which u want to change the password in between d braces and after dat asterisk mark. d asterisk is important
6. you will see this line coming out
Type a password for the user :

7. well u cant see what u r typing so beware after hitting enter you will ask again to retype after that you password get changed successfully.

IF you like this post please comment

Thursday, November 26, 2009

TWO Gtalk Account on One single computer !!!!!!


Guys Gtalk application provided by GOOGLE.com is a nice instant messenger to get connected with lots of friend of yours. It shows you easily a quick overview of your inbox content whenever you do a login which in my case helps me a lot. Most of the persons are coming to this application every day and becoming a part of GTALK WORLD... well however sometimes it happen that you just have two gmail accounts and you want to login in gtalk with both google accounts but you cant do it simultaneously because GTALK provide only one login at a time. Well i have a simple trick for you after that you can play with your gtalk with your TWO SEPARATE totally different GTALK or GOOGLE or GMAIL accounts.

Okie.. where ever is your gtalk shortcut in your computer is...either in startup or in desktop or in quicklaunch...

1st. Right click on it...and go to its properties { it will open a new window saying "Google Talk properties"}

2nd. Then see the target field you can see something like this ".....{"C:\Program Files\Google\Google Talk\googletalk.exe" /startmenu} "...

3rd and important step... Okie remove the "startmenu" and write "nomutex" ......... it will become like this ".....{ "C:\Program Files\Google\Google Talk\googletalk.exe" /nomutex}"....

4th and final step.....now CLICK on OK ...and CLICK on that shortcut as many time as many GTALKS you need......
Add Image


well ..i hope you are going to like this post if you do please review..

Wednesday, September 30, 2009

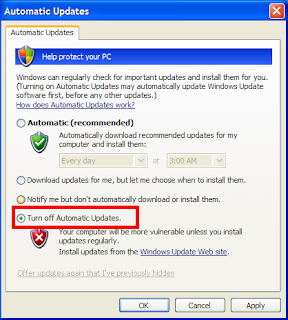
How to turn on Automatic updates in your personal computer


Due to some malfunctioning in your windows XP operating system sometimes it happens that your automatic updates can't get turn on.
It may happen due to some viruses, Trojan, or other things,however if you want to turn on the AUTOMATIC UPDATES just follow this simple steps.

Try registering the following:

Click Start, select Run and type:

regsvr32 wuapi.dll

regsvr32 wuaueng.dll

regsvr32 atl.dll

regsvr32 wucltui.dll

regsvr32 wups.dl
l


Press enter after each one and wait for the success message

After registering these dll files by RUN mode,your automatic updates will be start working instantaneously.
After that Enjoy your genuine Microsoft automatic updates which help to protect your personal computer from suspicious activities.

Tuesday, September 29, 2009

how to install window media player 11 -wmp11 bypassing wga check....window geunine advantage check


Windows Media Player 11, a media player by Microsoft systems is easily available for free download at Microsoft website officially, nevertheless, If you are having trouble installing Microsoft Windows Media Player 11 because of Windows Genuine Advantage-WGA check failure a genuine Microsoft operating system copy check tool; here is an simple trick to bypass the WGA installation and check without using any illegal crack.


Windows Media Player 11 installation bypassing WGA install and check:

1.Download Windows Media Player 11 installer from official website here.

FOR DOWNLOAD WINDOW MEDIA PLAYER 11 CLICK HERE

2.Download and install Winrar( it is easily available).

3.Right-click the downloaded file wmp11-windowsxp-x86-enu.exe and choose Extract to wmp11-windowsxp-x86-enu.exe/ from Winrar/Winzip shell context-menu as shown below.


4.Now, launch wmfdist11.exe and install the media player runtimes.


5. Restart your system.

6.Now launch the WMP11 setup wizard by executing - wmp11.exe and complete the setup process.


7. Now enjoy your favorite music on your perfect genuine player.

Saturday, August 22, 2009

Download gAlwaysIdle.exe to make your GTALK Status Always Idle


GTALK is a chatting application of GOOGLE which is very popular due to its simplicity and too much features. It is one of the best and lean instant messengers. Its use has considerably increased with its integration with ORKUT, a social networking site which is nowadays very much famous in all groups of different ages and also a web 18 genius award winner. Yes, its true that you cant play tic-tac-toe or make a buzz or send sounding emoticons or check weathers, however somewhere these not-added features in GTALK makes it too much popular. You can find your GTALK application in your GMAIL too. However, back when GMAIL Chat hadn’t introduced the Invisible mode, there was no way you could remain invisible from your GTALK friends when logged in. However, there is a program called gAlwaysIdle then, and when I am in a mood of “do not disturb me I am quite busy right now”; I just use it to change my status to ‘Idle’ on Google Talk (the yellow icon).

If you are an active user of both Google Talk and GMAIL chat simultaneously then I think you know that Invisible mode doesn’t work when you’re using both. That’s when gAlwaysIdle could home handy. gAlwaysIdle was build by a former Microsoft developer. It enables you to set the status of GTALK client with an extra option of being Idle permanently without actual leaving your computer, preventing unexpected disturbs (people normally didn’t buzz you while you’re not in front of computer). It supports XP SP2 and vista, grab it here and use it.


DOWNLOAD gAlwaysIdle.exe in the fastest way and free

Saturday, August 15, 2009

Video Lan Client Media Player----VLC Media Player 1.0.1


Are you getting tired of different types of specially built media players for special type of media files? Are you want to play any type of your favorite media file with a single click without getting your hand busy in search of some codec file needed for it while u try to play it in window media player? Are you wanted to play your movie file without taking care of its file extension? If you want to play your favorite media files video files in a single click and without downloading every time a special codec for files just download the Video Lan Client Media Player (VLC media player). Don’t get afraid by its tedious name. Its name might be look too much strange to you while operating on VLC media player is too easy. Just give it a shot man.


VLC Media Player is one of the most popular applications now a day for the most of computer users of modern world that have been recently updated to the 1.0 version, and now a new flavor has been released to users. VLC Media Player 1.0.1 comes with a series of improvements and bug fixes, including translation updates, fix for Qt and MacOS interface or codec updates for Mac OS and Windows. It is a open source software so you can easily download its code and modify it.

VLC Media Player comes as a highly portable multimedia player that also works as a multimedia framework that can play back almost all the audio and video formats available today, including MPEG-2, MPEG-4, H.264, DivX, MPEG-1, mp3, ogg, aac, and more. In addition, the player can also read DVDs, Audio CDs, VCDs and a series of streaming protocols.

The change log of VLC Media Player 1.0.1 shows, besides the already mentioned features, flv and mpeg2 seeking, along with wmv, wav, rtsp and ssa support, a fix of an integer underflow in Real pseudo-RTSP module, as well as port of the ZVBI module to Windows for full teletext support.

Improvements added to the existing features of VLC media player is Live recording, Instant pausing and Frame-by-Frame support, Zipped file playback, Customizable toolbars, AirTunes streaming, MTP devices on linux, Video scaling in full screen, RTSP Trick play support, or the fact that it can be used as server to stream on IPv4 or IPv6 via high-bandwidth networks.


Here are some key features of "VLC Media Player":

· Free, Open Source and cross-platform media player.
· Independant of systems codecs to support most video types.
· Can also be used as a streaming server, with extended features (video on demand, on the fly transcoding, ...).
· Live recording.
· Instant pausing and Frame-by-Frame support.
· Finer speed controls.
· New HD codecs (AES3, Dolby Digital Plus, TrueHD, Blu-Ray Linear PCM, Real Video 3.0 and 4.0, ...).
· New formats (Raw Dirac, M2TS, ...) and major improvements in many formats...
· New Dirac encoder and MP3 fixed-point encoder.
· Video scaling in fullscreen.
· RTSP Trickplay support.
· Zipped file playback.
· Customizable toolbars.
· Easier encoding GUI in Qt interface.
· Better integration in Gtk environments.
· MTP devices on linux.
· AirTunes streaming.
· New skin for the skins2 interface.


While window media player 11 setup comes with a size of 21 mb while VLC media player 1.0.1 for windows comes in a size of 19 mb. So you should try it. Here are the links for downloading VLC media player for various operation systems.


Download VLC Media Player 1.0.1 for Mac OS X


Download VLC Media Player 1.0.1 for Windows

VLC-Media-Player.shtml">Download Portable VLC Media Player 1.0.0 for Windows

Download VLC Media Player 1.0.1 for Linux

Tuesday, August 11, 2009

Internet Download Manager- the fastest download manager


Are you getting bored with the slow speed of downloading in your internet connection? Are you too much eager for seeing things what you are downloading from the internet as soon as possible? Are you getting tired of use of old download accelerators like DAP and others?


If your answer is “YES” for above questions then there is something new for you here. Here is the new download accelerator in this cutting edge of technology “Internet Download Manager”(IDM).
A really good, fast, easily usable, can be integrated with most of browsers and a lifeline for slow internet connection users. You can schedule, resume and accelerate downloads by up to 5 times with this accelerator. You can say this really true masterpiece. It comes with a 30day trial package and after 30 day you can’t live without it.

Here are some key features of Internet Download managers

v All popular browsers and applications are supported and can be integrated into any 3rd party Internet applications.

v Download with one click-click on a download link in a browser, IDM will take over the download and accelerate it. It supports HTTP, FTP and HTTPS protocols.

v Download Speed- IDM can accelerate downloads by up to 5 times due to its intelligent dynamic file segmentation technology.

v Resume able Downloads-IDM will resume unfinished download from the place where they left off.

v Simple installation -Quick and easy installation program will make necessary settings for you, and check your connection at the end to ensure trouble free installation of IDM.

v Automatic Antivirus lookup-It makes your downloads free from viruses and Trojans, the most annoying thing on internet.

v Advanced Browser Integration-This feature can be used to catch any download from any application, when enabled I don’t think any of download managers have this feature.

v Built-in Scheduler- IDM can connect to the Internet at a set time, download the files you want, disconnect, or shut down your computer when it's done so that you can rely totally on your computer and take a good NAP.

v Proxy servers-works with Microsoft ISA, and FTP proxy servers.

v Authentication protocols-Basic, Negotiate, NTLM, and Kerberos. Thus IDM can access many Internet and proxy servers using login name and password.

v Download all feature-IDM can add all downloads linked to the current page.

v Customizable Interface-Choose the order, buttons and columns appear on the main IDM window.

v Download Categories-IDM downloads are organized automatically using defined download categories.

v Quick Update Feature-Quick update may check for new versions of IDM and update IDM once per week.

v Download limits-Progressive downloading with quotas feature. The feature is useful for connections that use some kind of fair access policy (or FAP) like Direcway, Direct PC, Hughes, etc.

v Drag and Drop-Simply drag and drop links to IDM, and drag and drop complete files out of Internet Download Manager.

v Multilingual- use it in Arabic, Bosnian, Bulgarian, Chinese, Croatian, Czech, Danish, Dutch, French, German, Hungarian, Italian, Japanese, Lithuanian, Macedonian, Polish, Portuguese, Romanian, Russian, Slovenian, Spanish, Thai languages.


You can download your own Latest IDM copy by dowloading on the following link

DOWNLOAD IDM 5.17

Sunday, August 9, 2009

Decoding Error Messages - Web


As you surf the Net, you will undoubtedly find that at times you can't access certain websites. Why, you make wonder? Error messages attempt to explain the reason for that and other problems. Unfortunately, these cryptic messages baffle most people. We've deciphered the most common ones:


400 - Bad Request


Problem: There's something wrong with the address you entered. You may not be authorized to access the web page, or maybe it no longer exists.

Solution: Check the address carefully, especially if the address is long. Make sure that the slashes are correct (they should be forward slashes) and that all the names are properly spelled. Web addresses are case sensitive, so check that the names are capitalized in your entry as they are in the original reference to the website.


401 - Unauthorized


Problem: You can't access a website because you're not on the guest list, your password is invalid or you have entered your password incorrectly.

Solution: If you think you have authorization, try typing your password again. Remember that passwords are case sensitive.


403 - Forbidden


Problem: Essentially the same as a 401.

Solution: Try entering your password again or move on to another site.


404 - Not Found


Problem: Either the web page no longer exists on the server or it is nowhere to be found.

Solution: Check the address carefully and try entering it again. You might also see if the site has a search engine. If so, use it to hunt for the document. (It's not uncommon for pages to change their addresses when a website is redesigned.) To get to the home page of the site, delete everything after the domain name and hit the Enter or Return key. For example, if the address is:

http://careurcomp.blogspot.com/2009/08/decoding-error-messages-web.html

Remove English/HTML/ email.htm.


503 - Service unavailable


Problem: Your Internet service provider (ISP) or your Internet connection may be down.

Solution: Take a stretch, wait a few minutes and try again. If you still have no luck, phone your ISP or system administrator.

Saturday, August 8, 2009

Working with the Vista Index


The new search capabilities in Windows Vista are certainly a significant step up from those in Windows 2000 and Windows XP. For once, you can actually find what you're looking for in a reasonable amount of time. By default, however, the new Vista search feature only indexes the partition where the operating system is installed, which is usually the C: drive. That's fine, unless you have a second partition or second hard drive you use to store your data files. In that case, you have to manually add the second hard drive to the search index. Luckily, it's only a two step process!


Step 1: Turn On the Search Indexing for the Second Hard Drive/Partition


Double click on your My Computer icon, right click on the drive and choose Properties. Then check the box that says "Index this drive for faster searching." Finally, click OK.


For some strange reason, that doesn't actually add the drive to the index, so you have to perform one more step.


Step 2: Add the Drive to the Indexing Options


Go to Start, Control Panel and click on Indexing Options. In the dialogue box, you'll see a list of current locations that are indexed by the Indexing service. Click on the Modify button and check off the second partition or hard drive you want indexed (for example, D:, E:, etc).


If you don't see the drive you're looking for, make sure you press the "Show all locations" button at the bottom of the window. You should then see all of the possible choices:


That's it! Windows Vista will then begin indexing the new location and results from the extra drives will appear in your searches. Now, you can also add network drives to the Vista search index, as long as the drive is a mapped drive. Note that turning on the indexing in Vista is a great way to find files quickly and I would suggest keeping it on all the time. However, you may want to turn it off if your computer seems to be running slow.


Either way, this is an easy way to make your Vista searching even easier!

Friday, August 7, 2009

Access Stored User Names and Passwords with rundll32.exe


The Stored User Names and Passwords applet lets you assign user names and passwords to use when needing to authenticate yourself to services in domains other than the one you are currently logged into.

The normal way of running this applet can be difficult to find quickly, so here is a way to launch it using a desktop shortcut using the rundll32.exe program:

Click on START - RUN and type the following (follwed by ENTER):

Rundll32.exe keymgr.DLL,KRShowKeyMgr

Thursday, August 6, 2009


Hibernation is a feature that allows your system to shut down quickly and save everything that is open in the RAM to be stored on the hard drive until the computer is powered on again.

XP and 2000 use a file called hiberfil.sys to save everything it needs when they go into hibernation. If you never use the hibernate function, you can turn it off.

When this feature is disabled, the hiberfil.sys file is deleted. This can free up the as much disk space as the amount of ram that you computer has. For example, if you have 1GB of RAM, you could be freeing up to 1GB of hard drive space.

In XP, go to Control Panel > Power Options > Hibernation and uncheck / Enable hibernation.

In 2000, go to Control Panel > Power Options > Hibernate / tab and uncheck / Enable hibernate support.

If you should want to re-enable hibernation, go back in and check / Enable hibernation in XP or Enable hibernate support in 2000.

Friday, July 31, 2009

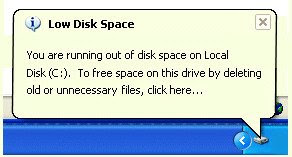
Disable "Low Disk Space" Notification in Wondows XP


Open regedit & follow the steps below:

1. Navigate to HKEY_CURRENT_ USER\Software\
Microsoft\Windows\ CurrentVersion\ Policies\ Explorer

2. On the Edit menu, click New, click DWORD value .

3. Name the new DWORD Value as NoLowDiskSpaceChecks

4. Right click the new DWORD Value and Modify the data value to 1.

5. Exit the registry editor and restart your computer.

Wednesday, July 29, 2009

Fastest Way to Refresh a Page in Firefox

This How To is made for those that refresh pages very often and look for ways to improve their efficiency.

It's a small trick.


Ok, there are 3 ways to refresh a page in Firefox efficiently:

1. Pressing F5, this is a simple and fast way, requires your finger to press a key.

2. The RAW refresh is the second most efficient way, it's used when you want to refresh a page that loads from the cache some images instead of contacting the server. Therefore even you have a new picture on a page you'll still see the old picture. To RAW refresh press CTRL+R.

3. The third method is to push the refresh button which is located through the toolbar's other extensions and buttons.

4. The fourth and in my opinion the fastest way to refresh a page and the most comfortable because you only use the mouse and you move it very little even comparing it with pushing the refresh button is like this:

1. Click on the page tab you want to refresh and drag it anywhere on the page. The page will be refresh as soon as you let go. Because you do it with only 1 hand is comfortable, I believe is faster then the refresh button. Try this trick, I believe you'll like it.

Monday, July 27, 2009

Just a Tracking post

TRACKing post

Enable and Disable your automatically running CD-ROM


When you insert a CD-ROM disk,


your CD-ROM drive always runs automatically for the default setting (autorun CD-ROM). We have a tip to disable running your CD-ROM drive whereas you can enable it running again as you want. This tutorial will teach you to enable or disable running CD-ROM drive by editing a registry. Follow these steps.

* Click Start > Run .
* In the Run dialog, type regedit and press Enter.
* In the Registry Editor window, Go to the path like below,

HKEY_LOCAL_MACHINE\ SYSTEM\CurrentCo ntrolSet\ Services\ Cdrom


* Now you can see the AutoRun DWORD in the right panel, double click on it.
* Change the Value data to 0 for disabling automatically running CD-ROM, then click OK. If you want it to automatically run again, you must fill 1 value in the Value data.
* Close Registry Editor window and reboot your computer.
* Test it by inserting your CD-ROM disk. Now your computer does not automatically runs your disk.

Sunday, July 26, 2009

Want to increase your laptop battery's life

Follow the few steps to increase the laptop battery's life:

Lower the backlighting on your screen:

The screen of your Laptop takes up significant amount of power and you do not require its maximum brightness. You should have to check your system and decrease the screen brightness it to a comfortable point.


Stop your wireless signal when you are not using.

After turning off your Laptop can save max. 20 minutes of your laptop's battery time because WiFi can use a considerable quantity of power. By right clicking you can stop your WiFi signal when you are not using.


Manage the correct power scheme in XP

Windows XP contain a number of predetermined power plans, which control settings like how rapidly your laptop turns off and when your screen saver boots in. You can change your laptop power scheme by choosing Control Panel > Power Options. For max. Battery life from the "Power scheme" chooses the option "Max. Battery" and decline the list. There are good choices for you just like "Low Power Mode" and Portable /Laptop. They don't conserve as much power as Max Battery. After selecting a power scheme you click Ok button to finish the process.

Thursday, July 23, 2009

Computer Repair Tips


You only had experience with Windows operated computers, so this is what we referring to you. Computer repair specialists were always hard to find, and many times we had to try to figure out a solution to fix a computer which stopped working, because no specialist would come home, and to take a PC to the service company was extremely troublesome.


Computer Repair Tip 1: Defragment Often


The information on the hard disk is written in chunks called sectors. One application can spread across many such sectors, and if they are not next to each other, the head which reads the information on the hard disk has to make additional movements, thus increasing the reaction time of the computer, resulting in sluggish, slow launch of the respective application.

Computer Repair Tip 2: Clean Up Disk Errors

This is easy to do: on My Computer, select the drive you wish to clean up errors on, right-click on it, then select Properties. The first option from the second tab of the menu that opens is Check Disk. It won't run, but you can schedule it to start next time when you'll reboot your computer.

Computer Repair Tip 3: Remove Temporary Files

This is called the Disk Cleanup and you can find it in the same menu as in Computer Repair Tip no 2. It will free up some space on your hard drive, which is good, but the speed gain won't be noticeable for human senses.

The only computer repair tip that worked perfectly each time, and offered me a fast system, at least for a couple of months was to reinstall Windows.

Saturday, July 18, 2009

How to disable Ctrl+C at Windows startup How to disable Ctrl+C at Windows startup

The problem: Windows lets anyone press the Ctrl+C keys during its initial booting phase and stop the booting. If the user is knowledgeable enough about the MSDOS mode, s/he can then examine the contents of all your drives and folders, etc. To prevent this from happening, you can reconfigure your computer to disable the Ctrl+C keys in the MSDOS mode.

The following method may be used to fix this problem:

First, make a backup copy of the C:\CONFIG.SYS file (just in case something goes wrong) by copying this file onto your emergency startup disk. Also, make sure that you can actually use the startup disk to boot your computer into the MSDOS mode.

Open C:\CONFIG.SYS with Notepad and add the following line at the very beginning of the file:

BREAK=OFF

Now save the file and reboot the computer.

For more information about the CONFIG.SYS file and its contents, please refer to the file Config.txt, installed by Windows in your C:\Windows folder.

Note: Note that this setting also disables Ctrl+C for all programs running in the MSDOS mode.